Let's Build with PLRelational, Part 1
This is our latest entry in a series of articles on PLRelational. For more background, check out these other articles in the series:
- Reactive Relational Programming with PLRelational
- Introduction to Relational Algebra using PLRelational
- PLRelational: Observing Change
- PLRelational: Storage Formats
Since we started opening up about PLRelational, a number of developers have asked us how it compares to some particular existing technology, e.g. Core Data, Rx, Cocoa Bindings, or SQLite. It's a good question, but before we can clearly explain the differences, we should first dissect a working application that was built using PLRelational.
Our goal with this article is to give a big picture look at PLRelational and how it can be used to build an actual application. We will show how you can do things the PLRelational Way, and that will give us a baseline to help compare and contrast to existing technologies in a future article.
We believe PLRelational[+Binding] gives you a unique, expressive vocabulary for declaring how your UI is connected. Once you've declared those relationships, the frameworks can do a lot of heavy lifting, simplifying the way you build an application. As we will demonstrate here, there are a few patterns commonly used when working with PLRelational that can help bring a sense of order and sanity to application development.
What Should We Build?
To get started, we need to think of a relatively constrained type of application to build, and there's no better (or more clichéd) example than a to-do app, so let's run with that. In a nutshell, our application will allow the user to:
- enter new to-do items
- mark an item as completed
- change the item text
- add tags to an item
- add notes for an item
- delete an item
When the application is finished, it should look something like the following, except a bit prettier:
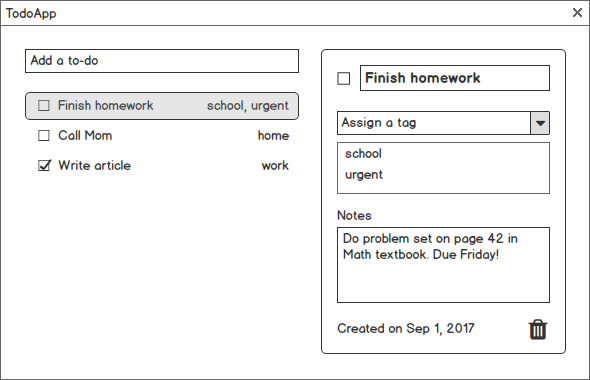
Additionally, our application should automatically save everything to disk, and it should allow the user to undo or redo any change.
How Do We Organize It?
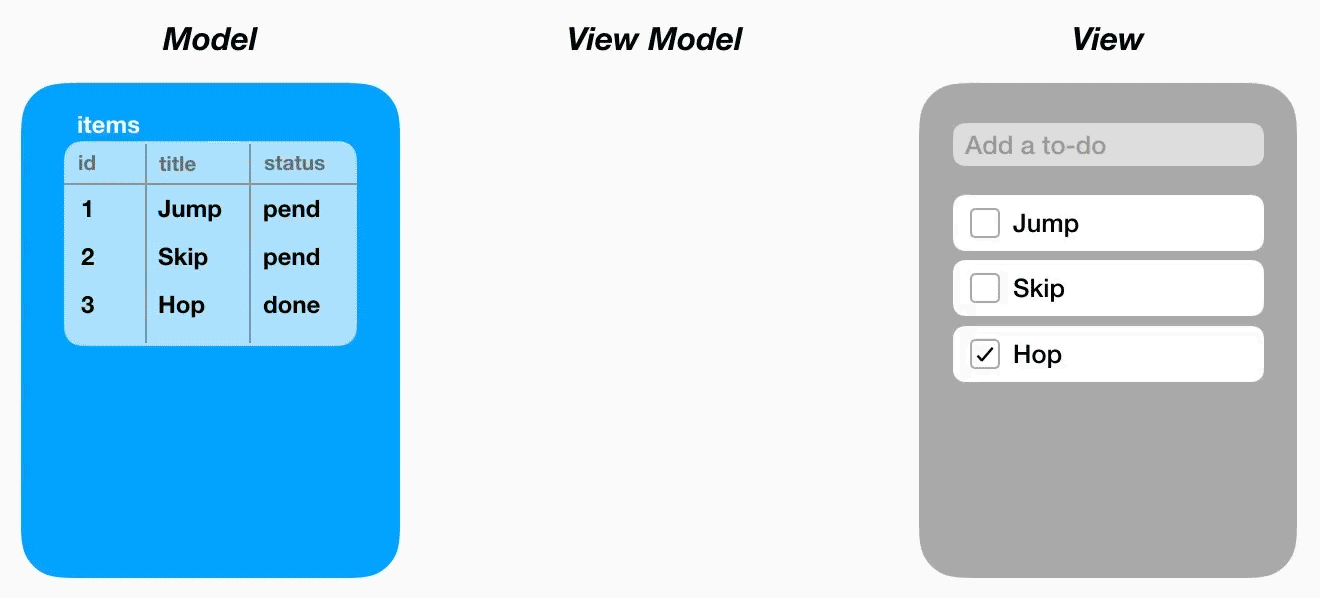
When building applications using PLRelational, we use an approach that is very similar to MVVM (Model / View / View Model).
In traditional MVVM-based apps, it is often the case that the Model layer is based on some sort of in-memory object graph that is pulled from (and stored back to) some source, e.g. files on disk, a database, or the network.
With PLRelational, we forego the traditional object graph and instead build the Model by declaring how our source relations are laid out (most likely backed by some on-disk storage, e.g. plists or SQLite) and defining some base operations that modify those relations.
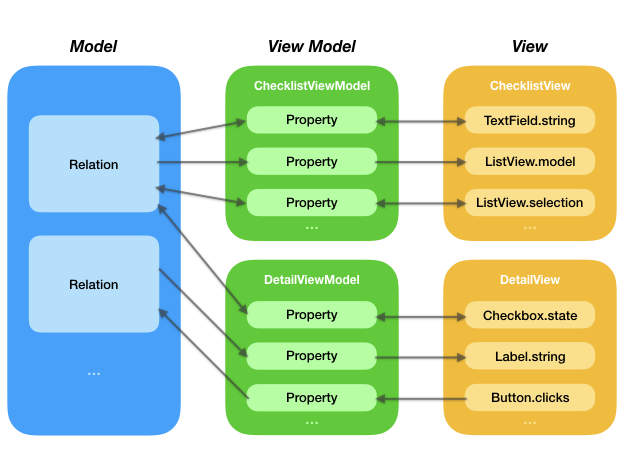
As seen in this diagram, when building with PLRelational the implementation of each piece of the user interface is typically spread across three layers:
In the Model layer, we declare our source
Relations and define transactions that modify thoseRelations.In the View Model layer, we declare
Relation/Signal/Propertychains that express how the data from our Model layer is to be transformed for display. If the interaction is two-way, as is the case for something like a text field, we'll also declare how changes made by the user should be transformed before being stored back via the Model layer.In the View layer, we define the views and bind them to the
Propertychains that we expressed in our View Model layer.
Note that in a larger application, you would probably consider splitting up the Model layer over multiple classes for improved separation of concerns and modularity. Our to-do application on the other hand is relatively simple, so a single Model class will be sufficient to encapsulate all the relations we care about.
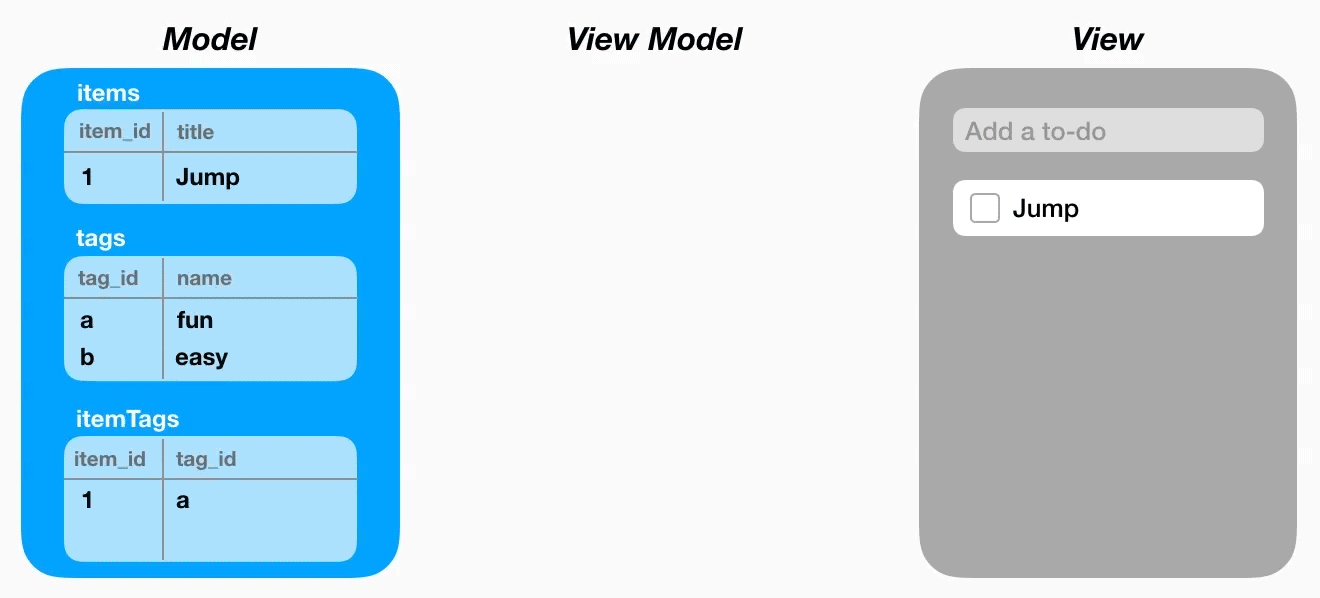
Declaring Relations
Let's begin building our Model layer by declaring the attributes and layout of our 4 relations, which will be stored on disk using property list files:
/// Scheme for the `item` relation that holds the to-do items.
enum Item {
    static let id = Attribute("item_id")
    static let title = Attribute("title")
    static let created = Attribute("created")
    static let status = Attribute("status")
    static let notes = Attribute("notes")
    fileprivate static var spec: Spec { return .file(
        name: "item",
        path: "items.plist",
        scheme: [id, title, created, status, notes],
        primaryKeys: [id]
    )}
}

/// Scheme for the `tag` relation that holds the named tags.
enum Tag {
    static let id = Attribute("tag_id")
    static let name = Attribute("name")
    fileprivate static var spec: Spec { return .file(
        name: "tag",
        path: "tags.plist",
        scheme: [id, name],
        primaryKeys: [id]
    )}
}

/// Scheme for the `item_tag` relation that associates zero
/// or more tags with a to-do item.
enum ItemTag {
    static let itemID = Item.id
    static let tagID = Tag.id
    fileprivate static var spec: Spec { return .file(
        name: "item_tag",
        path: "item_tags.plist",
        scheme: [itemID, tagID],
        primaryKeys: [itemID, tagID]
    )}
}

/// Scheme for the `selected_item` relation that maintains
/// the selection state for the list of to-do items.
enum SelectedItem {
    static let id = Item.id
    fileprivate static var spec: Spec { return .transient(
        name: "selected_item",
        scheme: [id],
        primaryKeys: [id]
    )}
}
We use enums to provide a namespace for the Attributes associated with each Relation. For each one we also declare a Spec (typealias for PlistDatabase.RelationSpec) that tells our PlistDatabase how the relations will be stored on disk in property list format. In the case of ItemTag and SelectedItem, we use identifier attributes that act as foreign keys referring to the Item and Tag relations.
Preparing the Model
The next step is to use these "specs" to initialize a PlistDatabase by loading existing data from disk or creating a new one. We wrap it in a TransactionalDatabase so that we can capture and apply snapshots. That class also has a handy saveOnTransactionEnd feature that, when enabled, gives us auto-save functionality. Finally, we wrap the TransactionalDatabase in an UndoableDatabase which will help us coordinate undoable/redoable operations:
class Model {
    let items: TransactionalRelation
    let tags: TransactionalRelation
    let itemTags: TransactionalRelation
    let selectedItemIDs: TransactionalRelation

    ...

    init(undoManager: PLRelationalBinding.UndoManager) {
        let specs: [Spec] = [
            Item.spec,
            Tag.spec,
            ItemTag.spec,
            SelectedItem.spec
        ]

        // Create a database or open an existing one (stored on disk using plists)
        let path = "/tmp/TodoApp.db"
        let plistDB = PlistDatabase.create(URL(fileURLWithPath: path), specs).ok!

        // Wrap it in a TransactionalDatabase so that we can use snapshots, and
        // enable auto-save so that all changes are persisted to disk as needed
        let db = TransactionalDatabase(plistDB)
        db.saveOnTransactionEnd = true
        self.db = db

        // Wrap that in an UndoableDatabase for easy undo/redo support
        self.undoableDB = UndoableDatabase(db: db, undoManager: undoManager)

        // Make references to our source relations
        func relation(for spec: Spec) -> TransactionalRelation {
            return db[spec.name]
        }
        items = relation(for: Item.spec)
        tags = relation(for: Tag.spec)
        itemTags = relation(for: ItemTag.spec)
        selectedItemIDs = relation(for: SelectedItem.spec)
    }
}
Wiring Up the User Interface
Now that we've laid out our primary relations, let's set our sights on building out the user interface.
In this article we will be focusing on the left side of the application, namely the "Add a to-do" field and the list of to-do items. (There is a lot to share about the implementation of the right side too, but in the interests of time and space we will save that for Part 2, coming soon.)
Click the "Play" button below to see this part of the application in action:
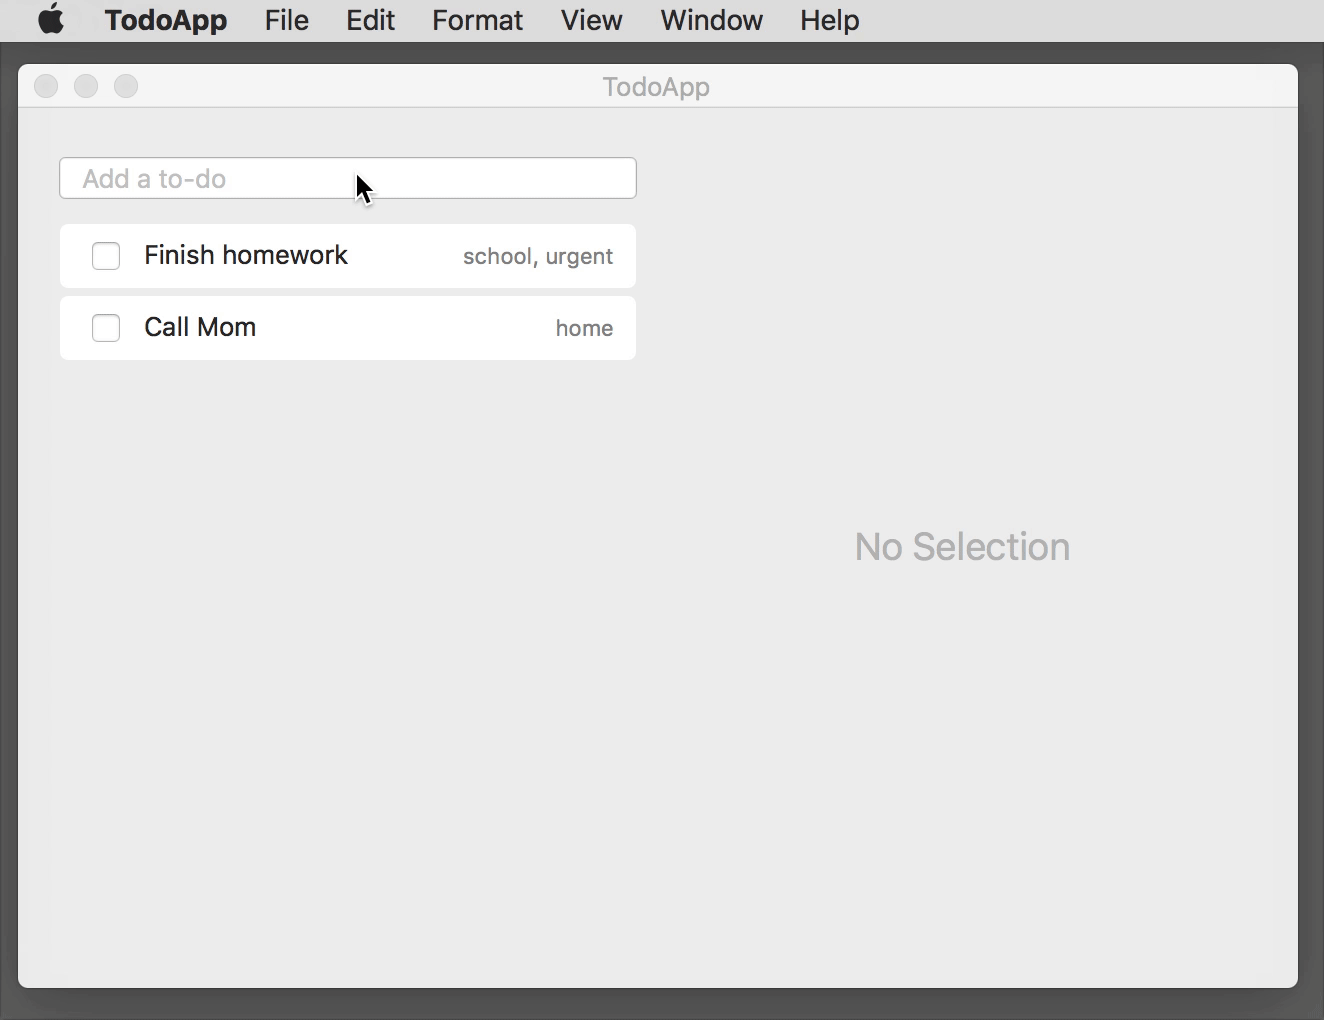
To keep things organized, I decided to break the application down into distinct functional requirements. Each requirement corresponds to a specific portion of the UI and explains how we want it to behave.
The following interactive screenshot shows the left half of the app in its completed state. Each red dot corresponds to a single functional requirement. Hover over a dot to read a summary of the requirement, then click to see how we implemented it using PLRelational.
In each of the sections that follow, we will show the relevant portions of code (really, a cross section of the Model, *ViewModel, and *View classes) that were used to implement a functional requirement. To explore the sources in Xcode, feel free to clone the PLRelational repository and follow along with the sources under Example Apps > TodoApp in the project.
REQ-1: New Item Field
A text field at top-left that allows the user to enter new to-do items. When the user types a non-empty string, a new pending item should be added at the top of the list, and the text field should be cleared.
Let's translate this requirement into some code. The first step is to define an undoable transaction in the Model that adds a single row to the items relation. We expose this as an ActionProperty in the ChecklistViewModel, and then set up a binding in ChecklistView:
class Model { ...
    /// Adds a new row to the `items` relation.
    private func addItem(_ title: String) {
        // Use UUIDs to uniquely identify rows.  Note that we can pass `id` directly
        // when initializing the row because `ItemID` conforms to the
        // `RelationValueConvertible` protocol.
        let id = ItemID()

        // Use a string representation of the current time to make our life easier
        let now = timestampString()

        // Here we cheat a little.  ArrayProperty currently only knows how to sort
        // on a single attribute (temporary limitation), we cram two things -- the
        // completed flag and the timestamp of the action -- into a single string of
        // the form "<0/1> <timestamp>".  This allows us to keep to-do items sorted
        // in the list with pending items at top and completed ones at bottom.
        let status = statusString(pending: true, timestamp: now)

        // Insert a row into the `items` relation
        items.asyncAdd([
            Item.id: id,
            Item.title: title,
            Item.created: now,
            Item.status: status,
            Item.notes: ""
        ])
    }

    /// Adds a new row to the `items` relation.  This is an undoable action.
    func addNewItem(with title: String) {
        undoableDB.performUndoableAction("Add Item", {
            self.addItem(title)
        })
    }
}

class ChecklistViewModel { ...
    /// Creates a new to-do item with the given title.
    lazy var addNewItem: ActionProperty<String> = ActionProperty { title in
        self.model.addNewItem(with: title)
    }
}

class ChecklistView { ...
    init() { ...
        // Add a new item each time a string is entered into the text field
        newItemField.strings ~~> model.addNewItem
    }
}
Note that the EphemeralTextField class in PLBindableControls takes care of delivering the text via its strings signal and clearing out the text field when the user presses enter.
Here we've established a pattern — breaking things down across the three components — that we'll see again and again in the implementation of our app. This layout encourages isolation between individual pieces of the UI and also allows for easy testing (a topic that we'll cover in a future article).
REQ-2: Items List
A list view on the left side that contains all to-do items. The list should be sorted such that the first part of the list contains pending items, and the second part contains completed items. Pending items should be sorted with most recently added items at top. Completed items should be sorted with most recently completed at top.
Table and outline views are a frequent source of headaches when building iOS and macOS applications. PLRelationalBinding and PLBindableControls include the ArrayProperty and ListView classes, respectively, that do a lot of heavy lifting so that we can focus simply on how the data is related. Here we use arrayProperty to lift the contents of our items relation into a form that can track rows by their unique identifier and keep them sorted by their status value:
class ChecklistViewModel { ...
    /// The model for the list of to-do items.
    lazy var itemsListModel: ListViewModel<RowArrayElement> = {
        return ListViewModel(
            data: self.model.items.arrayProperty(idAttr: Item.id,
                                                 orderAttr: Item.status,
                                                 descending: true),
            cellIdentifier: { _ in "Cell" }
        )
    }()
}

class ChecklistView { ...
    init() { ...
        // Bind outline view to the list view model
        listView = CustomListView(model: model.itemsListModel,
                                  outlineView: outlineView)
    }
}
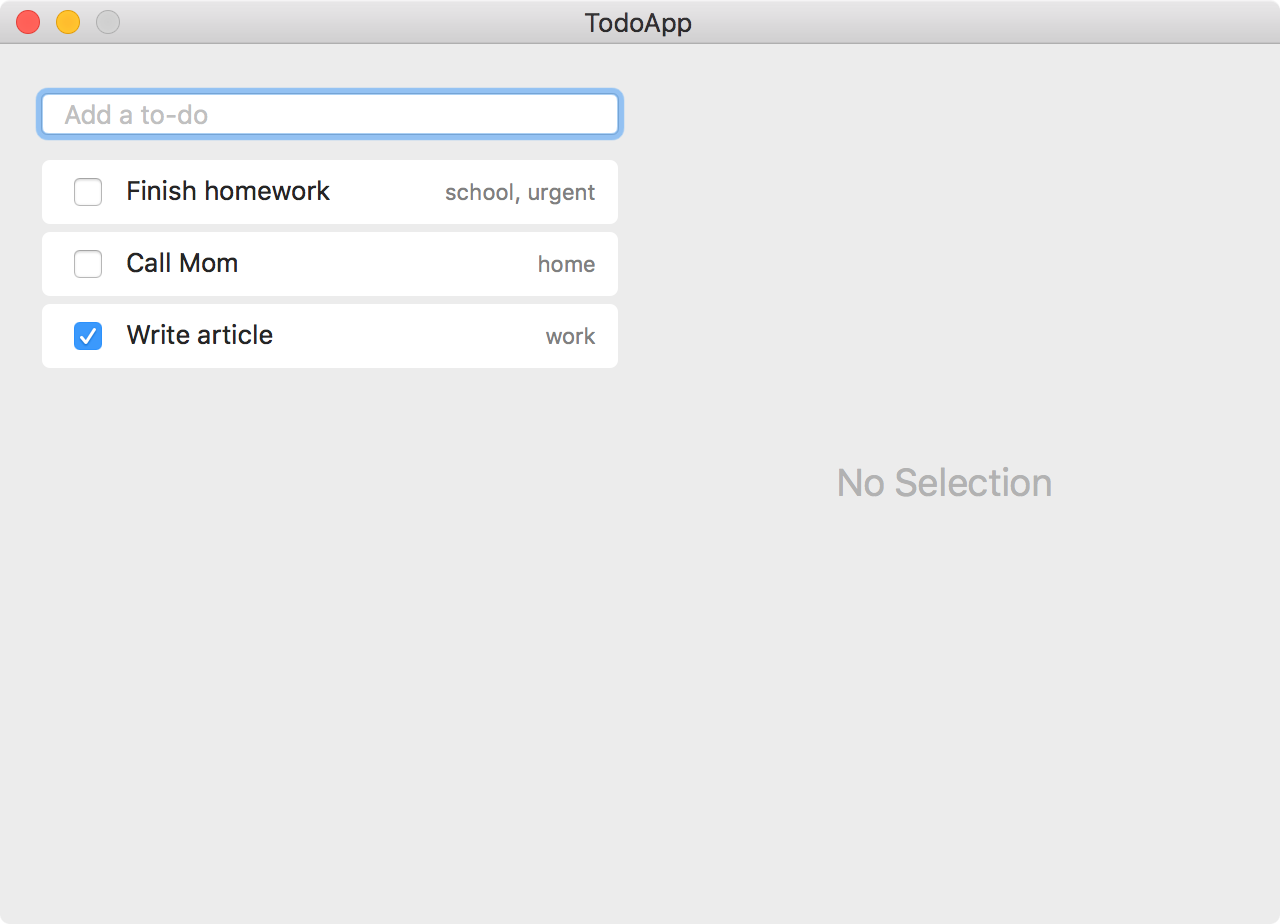
The ListView class reacts to changes in the ArrayProperty, taking care of animating insertions and deletions (as seen in the animation at the top of this section). As you can see, it takes very little code to set this up; no custom NSTableViewDataSource or NSTableViewDelegate implementation required.
REQ-3: Item Cell Completed Checkbox
Each list cell will have a checkbox on the left side indicating whether the item is pending (unchecked) or completed (checked). If the user clicks the checkbox such that it becomes checked, the item should animate down the list to sit at the top of the completed section. If the user clicks the checkbox such that it becomes unchecked, the item should animate to the top of the list.
In the previous step, we used ArrayProperty to describe how the rows of to-do items are organized, but we still need to break each list cell down into three parts: checkbox, text field, and (tags) label.
For each of these cell components, we need to set up a conduit that takes data from a specific part of the underlying relation and delivers it to that part of the list cell.
Click the following to see an animation that helps visualize how, for each checkbox, we define a Property (in this case, an AsyncReadWriteProperty<CheckState>) that serves as a two-way transform:
Now, let's translate this into code. In Model we define a bidirectional transform that converts the checkbox state to our custom status string and vice versa. ChecklistViewModel creates an instance of that transform for a given Row (i.e., a list cell), and then in ChecklistView we bind the checkbox state to the view model:
class Model { ...
    /// Returns a property that reflects the completed status for the given relation.
    func itemCompleted(_ relation: Relation, initialValue: String?) -> AsyncReadWriteProperty<CheckState> {
        return relation.undoableTransformedString(
            undoableDB, "Change Status", initialValue: initialValue,
            fromString: { CheckState(parseCompleted($0)) },
            toString: { statusString(pending: $0 != .on, timestamp: timestampString()) }
        )
    }
}

class ChecklistViewModel { ...
    /// Returns a read/write property that resolves to the completed status for
    /// the given to-do item.
    func itemCompleted(for row: Row) -> AsyncReadWriteProperty<CheckState> {
        let itemID = ItemID(row[Item.id])
        let initialValue: String? = row[Item.status].get()
        let relation = self.model.items.select(Item.id *== itemID).project(Item.status)
        return self.model.itemCompleted(relation, initialValue: initialValue)
    }
}

class ChecklistView { ...
    init() { ...
        listView.configureCell = { view, row in ...
            // Bidirectionally bind checkbox state to the view model
            let checkbox = cellView.checkbox!
            checkbox.checkState.unbindAll()
            checkbox.checkState <~> model.itemCompleted(for: row)
        }
    }
}
There are a few things worth highlighting here:
In
Model, ouritemCompletedtransform is set up usingundoableTransformedStringwhich provides built-in support for registering an action with the underlyingUndoManager.UndoableDatabasewill take care of reverting to the previous state if the user performs an "Undo" action, or reapplying the change after a "Redo" action.In
ChecklistViewModel, note how we useselectandprojectto hone in an individual value in a specific row of a relation. We are effectively setting up a live connection to that value, but note that we never have to explicitly load or store an object.In
ChecklistView, the<~>operator means "set up a bidirectional binding between these two things": changes initiated by the user flow back to the model, and vice versa.
REQ-4: Item Cell Title Field
Each list cell will have the to-do item title to the right of the checkbox. The user should be able to change the title by clicking in the list cell's text field. The title field should be updated if the user changes it in the detail view, and vice versa.
The process we use to hook up the text field for each list cell is almost the same as what we did for the checkboxes in the previous step. Click to visualize:

Once again, let's translate this into code. The implementation of this requirement is very similar to the previous one, so it should all look familiar:
class Model { ...
    /// Returns a property that reflects the item title.
    func itemTitle(_ relation: Relation, initialValue: String?) -> AsyncReadWriteProperty<String> {
        return relation.undoableOneString(undoableDB, "Change Title", initialValue: initialValue)
    }
}

class ChecklistViewModel { ...
    /// Returns a read/write property that resolves to the title for the given
    /// to-do item.
    func itemTitle(for row: Row) -> AsyncReadWriteProperty<String> {
        let itemID = ItemID(row[Item.id])
        let initialValue: String? = row[Item.title].get()
        let relation = self.model.items.select(Item.id *== itemID).project(Item.title)
        return self.model.itemTitle(relation, initialValue: initialValue)
    }
}

class ChecklistView { ...
    init() { ...
        listView.configureCell = { view, row in ...
            // Bidirectionally bind title field to the view model
            let textField = cellView.textField as! TextField
            textField.string.unbindAll()
            textField.string <~> model.itemTitle(for: row)
        }
    }
}
The itemTitle transform is even simpler than the itemCompleted transform that we saw in the previous step. The undoableOneString convenience gives us a two-way (read/write) property that resolves to the title string value of the to-do item, and then writes updates back to the source relation when the user changes that string in the UI (again the undo support is handled for us).
REQ-5: Item Cell Tags Label
Each list cell will have a read-only label containing applied tags on the right side. The tags should be comma-separated and in alphabetical order. The label should be updated whenever the user adds or removes a tag for that item in the detail view.
For the third and final piece of our list cells, we will display a string representation of the list of tags applied to that item. Unlike the previous two steps (checkbox and text field), this one doesn't accept input from the user, so it's just a matter of creating a read-only property. Click to visualize:
Here's what that looks like in code form:
class Model { ...
    /// Returns a property that resolves to a string containing a comma-separated
    /// list of tags that have been applied to the given to-do item.
    func tagsString(for itemID: ItemID) -> AsyncReadableProperty<String> {
        return self.itemTags
            .select(ItemTag.itemID *== itemID)
            .join(self.tags)
            .project(Tag.name)
            .allStrings()
            .map{ $0.sorted().joined(separator: ", ") }
            .property()
    }
}

class ChecklistViewModel { ...
    /// Returns a property that resolves to the list of tags for the given
    /// to-do item.
    func itemTags(for row: Row) -> AsyncReadableProperty<String> {
        return self.model.tagsString(for: ItemID(row))
    }
}

class ChecklistView { ...
    init() { ...
        listView.configureCell = { view, row in ...
            // Bind detail (tags) label to the view model
            let detailLabel = cellView.detailLabel!
            detailLabel.string.unbindAll()
            detailLabel.string <~ model.itemTags(for: row)
        }
    }
}
It's worth dissecting that tagsString declaration; it's an interesting one. Let's break it down step by step:
// Start with the `itemTags` source relation (Item.id : Tag.id pairs)
self.itemTags

// Select the rows corresponding to the given to-do item
.select(ItemTag.itemID *== itemID)

// Join with the `tags` relation to get the tag names
.join(self.tags)

// Take just the tag names (we can drop the IDs)
.project(Tag.name)

// Derive a `Signal` that carries the tag names as a `Set<String>`
.allStrings()

// Convert the `Set<String>` into a sorted, comma-separated string
.map{ $0.sorted().joined(separator: ", ") }

// Lift the `Signal` into an `AsyncReadableProperty` that offers the latest value
.property()
This demonstrates a common practice when working with PLRelational:
- Start with one or more
Relations - Slice and dice (i.e.,
select,join, andproject) until you've narrowed your focus onto a small set of data - Derive a
Signalthat extracts Swift-ly typed values - Transform the values using
Signaloperators likemap - Lift to an
AsyncReadablePropertyfor easier binding (and unit testing)
By declaring the relationships in this manner, any time the list of tags changes for that to-do item (by virtue of the user adding/removing tags, or as a result of undo/redo, etc), the list cell will automatically be updated to display the latest string value.
Wrapping Up
In this article, we demonstrated how to use PLRelational and its reactive-relational style of programming to build a real, working macOS application.
Building the PLRelational Way takes a slightly different mindset as compared to more imperative, object-oriented approaches. However, once you've learned the few core patterns that we presented here, the reactive-relational approach becomes second nature, and using the vocabulary offered by PLRelational can help simplify the way you build applications.
In Part 2, we will continue our deep dive and explore the right half of the to-do application. In that article we will cover topics such as modeling list selection, building with complex controls like combo boxes, using cascading deletion, and more.
The complete source code for this application is available in the PLRelational repository under the Examples/TodoApp directory and can be run directly from the Xcode project.
The Plausible Blog
Latest news and musings from the co-op.
Follow us: @plausiblelabs
Recent Articles
- PLCrashReporter Stewardship Moving to Microsoft September 12, 2019
- A New Home for VoodooPad December 14, 2017
- PLRelational: Query Optimization and Execution October 3, 2017
- Let's Build with PLRelational, Part 2 September 28, 2017
- Let's Build with PLRelational, Part 1 September 18, 2017